Tuesday 12 May 2015

Reflective Practice

Reflective Practice is a way of looking at your own work or that of others, to critically identify what we are doing and how well we are doing it. It's obviously very important that we do this so we can identify our strengths and weaknesses, and build upon them to improve in the future. We can also look at other people's work to either see why it was successful and how we can be successful in our own work, or the opposite and find out what we should avoid doing ourselves.


We were shown Gibb's Reflective Cycle which outlines how you can effectively criticise your practice/work. I find that it is a good guide to follow, and in the future I should refer to it more often when talking about my work especially when I am struggling on what to write. I think it will help me to easily identify what has gone wrong/right, and allow me to improve in the future. 

Effective Presentation Tips and Combating Presentation Anxiety

A long, long while ago, I sat through a presentation on how to give a good presentation. Where as I found a lot of the information to be self-explanatory - such as making the visuals easy on the eyes (easy to read and not using harsh colours for text/backgrounds) - I found the presentation to be extremely useful. It stressed the importance of knowing your audience,  and speaking to them as if they knew nothing about what you were presenting. This would encourage you to be informative about who you are and what you are doing/talking about, all the while being concise. But your slides shouldn't be a replacement of you, but instead be used as a way to point out key information in which you can build upon.

So Basically:

- Know your audience
- Know your subject
- Prepare yourself
- Don't use bullet points (irony)


We were also given a presentation on how to combat presentation anxiety shortly after. The nature of the presentation was practically the same, and basically told me to practice my material and try to remain calm though I did find this presentation to be a massive help when it came to doing my presentations for both Disseminate and Reflect briefs. It reminded me that I had to practice my material and to make sure I knew what I was talking about (which in hindsight I should have done more for my Disseminate presentation) and to remain calm.

Reflect: Presentation Day!

I'm really surprised at how well my presentation went today. I started to worry a bit when I couldn't get my speaker notes to work, and in the end I couldn't get it to and had to wing it in terms of notes. I found that because I was talking about my own experiences I didn't trip up over my words as much and I was much more confident at speaking. I think this is predominately down to the subject matter, but I'd also like to think that it's because I have gained confidence and presenting skills, which if so, I am thrilled about.

Ekko: People Waste a Lot of Time, Then, They Wish For More.

I know I've mentioned before that I enjoy playing the online game League of Legends, and that I really enjoy the animations that Riot Games release, but I'm going to briefly talk about their latest video. The animation is based on their new Champion Ekko, and it gives you an insight into what the character is going to be like. 

For starters, I appreciate that they are bring out more black characters to build on their diverse range of champions. I also like the design of the character (just like I like the design of pretty much all of the champions) and how even though he shares qualities with other champs, he still seems unique. 

Ekko: Seconds


I also like how the art/animation style in these videos by Riot differ from the actual game play, yet it still gives you an idea of how the character is going to be played. The videos are much more intense and they use a variety a different camera angles and shots to hook the viewers attention and to make the fight scenes more dramatic. This is obviously the complete opposite of the birds eye view that you get of the game when you play, and I like that these videos bring the gameplay to life in a different way to what I'm/you're used to.

Monday 11 May 2015

The Animated Self: Completed Animation

After weeks of frustration, I have finally finished my animation. Once I had altered the hand positioning, I exported the animation so I could open the file up in Premiere and add sound. I found clips of birds chirping on a royalty free sound effects website, and downloaded the ones that I thought would be most suitable and had these play alongside the animation. I extended the first frame of the animation so that I could make the audio fade in before the movement of the character started. 

Prancing in Spring - Finished Animation

I know I had encountered a few problems along the way, but I'm glad I did as it has made me wiser and I will know to avoid them in the future, and how I can overcome them if I encounter them again. For instance photographing my frames using the correct camera settings. This definitely would have saved me a lot of time and consequently a lot of stress. Despite all this, I have been able to create an animation that I am proud of, one that in my opinion has realistic, fluid movements which I'm happy that I have been able to create. 

Sunday 10 May 2015

The Animated Self: Animation is Nearing Completion!

I have really surprised myself with how much work I have managed to get done over the past three days. Today I have managed to get the visuals finished so now I am ready to start adding the finishing touches, such as sound, and maybe even a title introduction if needed. 

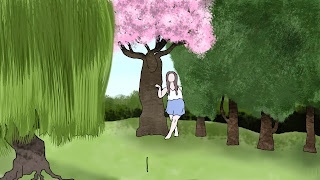
Today's focus was to get the drawing completed, so I started with the trees in the background, in particular the one in the centre. Originally I had pictured this to be an ordinary tree, but I got the idea to change it into a Cherry Blossom when I passed one in the car on the way home. I think Cherry Blossoms are so beautiful, and I thought including one in my animation would be a great way to brighten it up and add a variety of colour. 

Still of Cherry Blossom Tree 

To make the tree, I experimented with different brush presets until I finally found ones that looked like bark and leaves/flowers. It took me a while to do as there were so many different brushes and so many different ways I could use them, but once I had found my own way of working the rest of the trees (lined up on the right) were completed in no time, with the exception of the willow tree. As this tree had different leaves I had to experiment again with different brushes to find one that could mimic the leaves of a willow tree, as I didn't fancy drawing each individual strand. Again, I think I was successful at finding a tool that was useful, and I like that there is now a variety of texture in the background, making it more realistic and interesting to look at.

Still of Completed Trees

My next step was to finish the background, which was the easiest task of the day. I created the grass by using a number of different greens at different opacities and then created the sky by blending a light blue into an off white. I thought this looked okay but I felt that it was missing something. It didn't feel like it was a real place as there seemed to be no depth beyond the trees. I tried to overcome this problem by adding some sort of hedge or background scenery behind the trees, which I thought greatly improved the composition. In my opinion, this addition made the space much more believable as the world seemed to extend past this plane/set. 


Composition With and Without Hedge/Scenery

Now that my background was finished, I was ready to animate the trees that moved (The willow and the far left tree in the line of four). This was somewhat straight forward to do, as I simply had to make sure I used the same colours and brush presets for each tree. The willow was a bit harder to do, as I didn't really have a reference to work from, so I was unsure of how the leaves should have fallen. I gave it my best shot, and playing it back I think it runs rather smoothly. 
The next thing I had to do was to arrange my layers so that Maressa was positioned correctly amongst the trees. This meant that I had to dissect the video layer that she was created on into separate layers, three to be exact. I positioned the layer behind the cherry blossom tree, and I cut the layer once she had fully emerged from behind the tree. I then moved this second layer so that it was in front of the tree. I did the same thing for when she is at the willow tree, and moved the third layer in front of it once she had fully emerged so that she was positioned at the front of the composition. This didn't take long at all and it worked really well. (I have since discovered that I need to bring her hand forward in some of the frames, as it is still positioned behind the willow leaves. I noticed at the time, but completely forgot to implement). 

The next thing I added into the animation was more willow leaves when Maressa pushed them aside, because at the moment it looked as though it was 2D or that she was just brushing away the leaves at the edge. I added them in behind her character to make it seem like she was actually walking through the leaves rather than just walking up to a 2D layer of them and moving them aside.

Without Willow Back

With Willow Back


Once this was done I moved onto adding shadow, and I did so by using a similar colour to my grass and lowering the opacity. I started out by placing circles under her feet, making sure they got darker once they were closer to the ground and then I went over these with a larger circle for where the shadow for her body should be. I then adjusted the transparency of this layer until it was subtle enough for my liking. I didn't want it to stand out too much as I thought this would have brought attention away from Maressa. Even though it is only a subtle touch, I think it has worked wonders for my animation. It may not be entirely accurate as I was creating it from my imagination rather than any reference material, but I think it helps to create the illusion that she is moving throughout a 3D space rather than a 2D one.

Maressa's Shadows

I then thought that the tree's shadow in the foreground should move as its leaves are played with, so I drew them in on a separate video layer, but once I had finished them and played the animation back I wasn't too keen. I didn't think that the shadow was in the right place compared to the shadows of the other objects, and it didn't seem to move accurately/realistically. Instead of removing the work I had done, I simply made the layer invisible, in case I wanted to return to it.

Tree Shadow

Once I had finished the shadow I thought that was me finished in terms of visuals, but then I realised that I had somewhat messed up Maressa's layers. I noticed that when she pushes the leaves aside that her hand that does so isn't brought forward. I couldn't just move the positioning of the layer as this meant that she would be stood in front of the leaves too early. This means that I am going to have to make a separate layer for her hand so that I can bring that forward without moving her whole character. It won't take me long to do, and when I am finished with this I will be able to move onto post-production. 

Thursday 7 May 2015

The Animated Self: Considering Sound

As well as colour, sound is something that I want to get completed in time for my deadline. I have been thinking about the different sounds I could include and I think my favourite idea is to have the sound of birds tweeting. I don't think I want to have a song playing as it won't last very long, and I think something that is more subtle will work better in this case, since I am testing movements rather than creating a narrative.

Another idea that had crossed my mind was having a slight breeze sound playing. I think this would be suited for the environment, but it would suggest that the trees should be rustling and may look odd if they don't. I shall have to experiment with different sounds to see what fits best, but I know I only want to have something subtle playing. If I get the chance I may revisit animating and make the trees move slightly in the breeze as this will be the icing on the cake, and it may make my animation seem a touch more professional for exhibition. Again, this is likely not going to be explored before my deadline as it is simply a final touch, and I don't think I will find the time, but if I do, I'll definitely aim to add this in if needed.

The Animated Self: Adding Some Colour

Colouring in the girl surprisingly didn't take that long, only about 2-3 hours roughly and because of this completing the entire animation in colour before my deadline doesn't sound like such a far-fetched goal. I think it could easily be achieved if I continue to work like I have for the past few days; fast paced and focused. 

Girl in Colour

Even though the colouring is only basic, I think it has greatly improved the piece and it has made me excited to see what it's going to be like in full colour. Adding the colour has also made me think about the positioning of the layers, as the girl weaves in and out of the scenery. I have broken the original layer into three separate layers (at the back, in the middle and at the front) so that when I colour in the background and the other components, I can arrange them accordingly so she will move around the props.

I think it would be nice to add a little bit of shading to the girl if I find the time once I have finished the rest of the colour. It's not going to be something I aim to get completed for my deadline however, as I think this will be pushing the workload I can handle. BUT we shall see how it goes.

The Animated Self: Drawing Frames Completed!

Once I had finished cropping my video, the animation was going to be a whopping 199 frames long. I got started with drawing and I was happy to be using paper again having been glued to a computer for so long. This happiness soon wore off once I had gotten a couple of days into the drawing. I was soon getting frustrated as the drawing was taking a lot longer than I had expected as I was taking a while to figure out the movements and trying to make her look realistic. However I powered on and worked out how many frames I was going to have to complete a day in order to finish with time to spare so I could edit the animation, which was roughly around 20/30. 

In the end I actually finished drawing a couple of days before I had planned to, and once I had I thought it would be best to photograph the frames using Dragonframe rather than using a scanner, as this would be a much quicker, less painful process. 

Photographs of Frames

This was the first time I had seen my animation run through and I was so happy with how it looked. It really made me feel that all the hard work and frustration was worth it. Obviously there was still work to do as the video had my hand in the odd frame, it was slightly orange and it wasn't cropped down to the right size.

First Edit of Frames

I edited the levels of the frames in Photoshop, and from here I was going to remove the surrounding background of the page, so I could incorporate a background that I was going to create based on my initial plan. I then realised this was going to be harder than I had first anticipated. I tried to click the background by using the magic wand tool, but it would select random parts of the background, even when I decreased/increased the tolerance of the tool. This meant removing the background was going to be quite difficult, and the only way I could see getting around this problem would be to use the eraser tool. This was going to be incredibly time consuming as it was going to be a fiddly job, so rather than do this I decided to rotoscope my drawn frames in Photoshop. The logic was that this would be quicker than using the eraser tool, and when it came to adding colour (hopefully) I would have a much smoother edge to work with. So I went at it.

Half way through Rotoscoping my drawn footage, Mike came to talk to me about my progress and asked WHY I was redrawing my frames. It was only then that I realised that my original photographs of my frames weren't shot at the right size. I then realised how much easier I could have made my work for myself. I knew when I started that there had to be an easier way around my problem, but because I couldn't figure it out I had started Rotoscoping not wanting to waste time, as I only had a week and a bit until my deadline. In the future if I am going to animate traditionally, I am definitely going to have to remember to check the settings of my camera because I could have said so much time had I have done this correctly the first time around.

First Rotoscoped Attempt

Even though this probably wasn't the easiest way to overcome the problem I had, I'm still very proud of my progress and how quickly I was able to get this finished. It only took me two days to Rotoscope all 199 frames and I'm still in a position where I can edit my animation further before my deadline. From here I need to sort out the fact that the lines in the background can be seen through the objects in the foreground. To do this I shall have to either erase them in each frame where appropriate, or I could fill the objects in. Both ways sound like they are going to be quite time consuming, and because I am aiming to have the animation coloured for our exhibition, it makes sense to me to just start colouring the frames now. 

I'm going to start by colouring the girl as she is predominately in front of the objects in the scene and this will sort my problem of the background showing through. From here I will then colour the background and add in any necessary details. 

The Animated Self: My Chosen Idea and Getting Started

I decided I wanted to create a 15-30 second animation of someone dancing, more precisely my sister. I wanted to have her wear a floaty skirt and dance around a space so that I could practice drawing realistic human movements, as well as animating follow through and overlapping actions. Before I asked her to film a reference video for me, I searched on Youtube for something that I/she could take inspiration from when it came to dancing around.


I didn't really find much of relevance, but then I stumbled across this video. It wasn't much help in terms of content but it did give me the idea to have Maressa (my sister) dance around the garden and emerge from behind trees as if she were in some sort of forest. 

When we started to shoot the videos, it didn't occur to me that the tea towel was going to obstruct the shot of Maressa prancing around. It was only until I saw her disappear behind it that I realised we would have to shoot another shot. I went to stop and move the tea towel out of the way, but by that point Maressa had used it as a prop and pushed it out of the way as if it was a bunch of tree branches/vines. She thought because I hadn't moved it out of the way that I wanted her to interact with it, so a simple mistake lead to a great idea. I kept the tea towel where it was and shot a couple of takes of her dancing around and interacting with the scenery. 


Chosen Reference Video (Rendered at 12FPS)

I then chose my favourite video out of the collection for me to work from, and uploaded it into Photoshop to change the frame rate. From here I could have easily Rotoscoped the sequence, and I was very tempted, but I decided that because I was out of practice with traditional animation that this would be the best thing for me to go for. I had also experienced Rotoscoping with my Applied Animation project so I thought it would be a good idea to try and keep the projects different.

Initial Plan

Before I got started with drawing, I planned out a 16:9 space and in it had a rough sketch of what I wanted the scene to look like. This meant I wouldn't have to struggle later at cropping down the image and trying to work out where she was going to interact with things. I made sure to have these frames at the bottom of my peg board, so I could animate Maressa over the top of them.